A lot of the articles I have written so far have been either focused on technique, or how an athlete can work out how to get better
This article is more focus on things I have done as a coach (and some previously as an athlete) to aid my learning progress. This should be useful for coaches, and for athletes to think about what they are doing
This article is more focus on things I have done as a coach (and some previously as an athlete) to aid my learning progress. This should be useful for coaches, and for athletes to think about what they are doing
Section 1 – On water
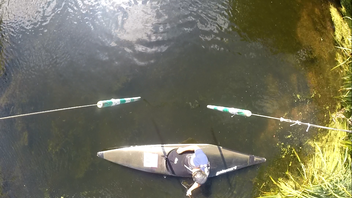
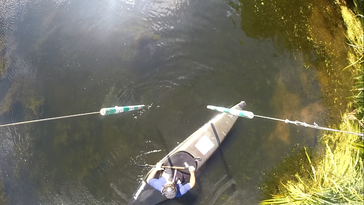
Flat Water Upstreams
As you can see this overhead view is very useful and I consider easy to set up. With this angle being static and repeatable you can compare upstreams from over a period of time to see progress, say every 6 months, and compare easily against others.
In this video you can see improvement has taken place. The paddler is out of the gate quicker by spending less time around the pole. This has come from understanding better what we what from an up, and working on stroke work and placement.
In this second video we can look and see that the junior paddler is slower than the U23/Senior paddlers. With this overhead view it is easy to see why, and some common factors. On the bow rudder up it is essential to get the hips above the gateline quickly. If not, then the paddler has to wait for the exit, due to the outside pole stopping them exiting. In the reverse up we can see that as the head passes the inside pole, we want the bows of the boat at least 90 degrees upstream, otherwise the hips slip and again the time around the inside pole is slower.
I hope to make a more in-depth article about flat water upstreams and this overhead angle in another more in-depth article soon.
Use of external markers
The use of external markers and objects either can give us more knowledge of force the paddler into what is required and can give instant feedback to the performance.
Upstreams - low outside pole
In this example, the outside pole is in the water. The point of this is we should know that in a good classic upstream the boats bow should be upstream of the outside pole (meaning good preturn has been achieved - see previous upstream articles for better understanding of this) If the outside pole is in the water, the paddler must come in with enough turn otherwise the pole is hit with the bow. This gives instant feedback to the paddler and the coach that this preturn is not achieved and most importantly, it makes it obvious, there is no ambiguity/difference of opinion, either the pole was hit, or it wasn't.
Upstreams - Boat placed below bearer line
This is a funny one. I use this a lot! We know we want a paddler to come in with turn, and to get the hips moving upstream through the gate. By placing yourself in a boat below the gateline either
Parallel to the gateline
or at a slight angle to force turn
This has two results.
1 – Forces the paddler to come in with the correct angle and movement.
2 - Give another point of reference to the paddler.
What I mean by these two points, is that paddler is either forced to come in with the correct angle and movement, or will hit you. I have found that with all the paddlers I have worked with doing this, the desire to NOT hit you is more than there desire to come in with no turn, thus achieving the desired technique. Also with another point of reference they have an smaller area to aim at and focus to get into (the area between you and the pole) and tend to hit that area better - by keeping “disciplined”.
“Disciplined” - the action of keeping focused on set established rules, keeping good width into ups, getting the hips up though the gateline, keeping focused on the desired outcome.
With this example of giving the paddler another point of reference to aim at, the two examples below I have found useful.
Pole or marker to hit – layby example
We can see that the paddler has something visual to aim at. In the layby up especially, the more bows we can put in above the gate, the better the eddy grips and holds the boat.
This means the boat does not end up low in eddy. The video below shows how the boat slides if the bows don't grip the eddy early, then how using the pole as a marker to hit, means the bows get in above the gate and grip.
Rhys who I asked to do this demo quoted afterwards that having something to focus on helped, and made him more precise. (in C2 esp its vital to know where the boat is wanting to go, so points of reference are even more key, so that both paddlers know where they are wanting to go)
Pole or marker to hit – sweep and punt example
Again markers to focus on or hit mean instant feedback, and help focus.
Markers on the bank also work well for punts.
Moving signs as markers or things to look at.
A key concept is that we tend to go where we are looking. If we focus on the wall deep in an eddy and we paddle with intent, generally we will get there. Its amazing though what we can use as markers to either look at or discuss on the back where we should be going. The amount of times I have moved these signs at HPP
(don't tell Footitt) to either discuss where I think to aim for, or to actually try to look at.
Fix upstreams – external poles
I am actually the most proud of doing this.
I found/find a lot of people do not come in with enough turn into a fix/sweep upstream, and put in the sweep too late. By putting a pole further outside of the inside pole and telling the paddler to sweep as they pass the first pole, they were in a perfect place by the time they reached the second pole. Then came the easy task of removing the first pole or moving the pole gradually in, and with the paddler being now used to sweeping early (muscle memory) and having a better understanding of where to sweep, then they will sweep earlier than they used to, achieving a better fix up. The last clip even shows that you can even reduce the gate width down, so there is only room for the head to pass though.
Section 2 – On Bank
Setting up gates on bank to practise stroke patterns
This may sound silly but trust me, the way we move on the bank is the way we move on the water.
If we better understand how we are moving our arms, and our stroke patterns then moving it onto the flatwater then onto the whitewater will be easier.
Stokework is so important to canoeslalom. If we can really en-grain technique then we can use this without thinking and also have a better more solid base to adapt from.
Its also easy, just hang a pole from somewhere, grab a paddle and there you go.
If its working on keeping your bowrudder above and outside of the inside pole on upstreams, to working on slices, so being more nimble around poles, its worth investing in, esp if water time is low, or learning a new move. Also it is easier to and stop and see what shapes you are pulling, and easier to get someone to manipulate to where you want to me – ie get someone to move your hand to where it should be.
We can even do this at home indoors (if homeowner gives permission), or in the garden
We can even do this at home indoors (if homeowner gives permission), or in the garden
Diagrams for lines
Slalom canoeing is all about line. What lines to take to be fast, how to use and understand features. Drawing on paper, or using the natural environment – stones, twigs as boats etc and working out where to go, what water to use, and how the water will act on the boat.
 | 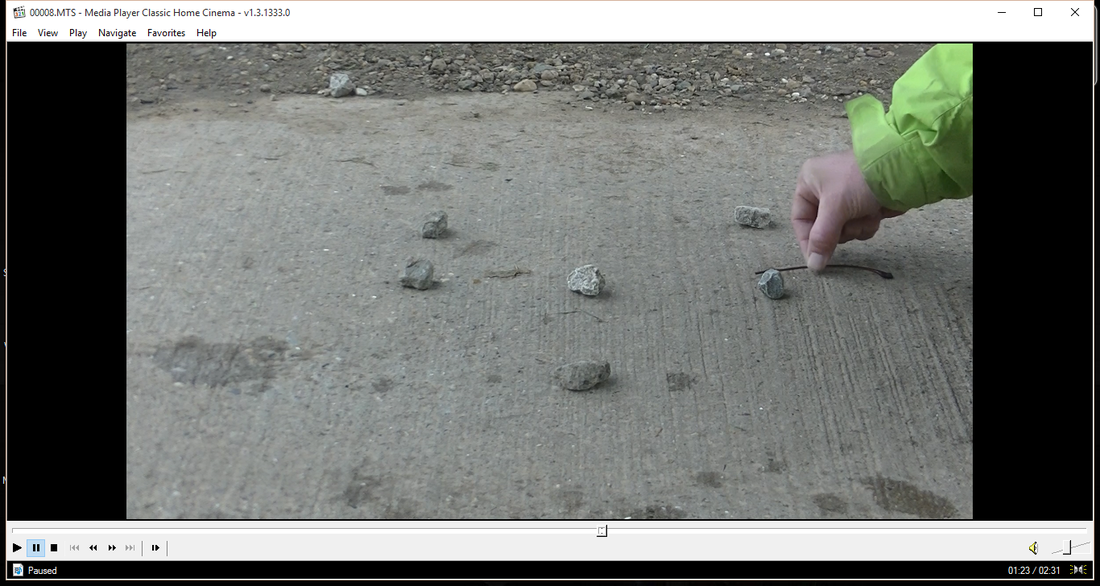 |
Here is a little clip, I was using to show what was happening in a spin (slipping downstream) and where was ideal to spin (in the gateline)
Priming, prep, Ideal model, and finding info.
Use of Ideal model
We start of with a question – How do infants learn?
A lot of early development comes from watching, and figuring out. We can do the same with canoeing, the more we watch the more information we can absorb and the better our understanding can become. Also by finding ideal models we can copy the aspects we desire, which will make us fast.
Here are two upstreams I love – the stroke pattern, the shapes, the run of the boat, and the solidness of both upstreams draw me to this style.
| | |
Every time I want to remember want I want for a basis for an upstream, I watch these clips. Now I feel you should never copy this, but understand the components that make these upstreams fast. Add your style onto these components.
An anecdote – 2005, Penrith worlds.
Doing Progressive courses and Rich Lee my coach at the time, points out after reviewing the last section of the run, that what I did was something Martikan would do. In fact he had. Three hours ago. I had not planned to do that, but through watching and absorbing I had done it without even realising.
This goes further – I actively watch sections of river to figure out how to do moves. Watching the water to see what it is doing, how it moves, and what paddlers are doing to do the moves they want.
If you watch carefully, a lot of paddlers end up doing the same things, because they work (read my crosses at Lee Valley article for this especially)
Now this is the interesting part. How can we learn more?
Simple anwer – Watch Youtube. There is an incredible about of paddling footage on Youtube, but you have got to watch it with the aim of either figuring out how someone has done what they have done, or to look for common themes.
Priming session
We know having clear goals for a session increase the quality of a session. If working on ups then video before session can help and make the points that need to be worked on much clearer, discussing what these key points are and how to work on them.
Either I could show an athlete either individual video clips, or a series of clips made into a little video to prime a session with (see below). This means the athlete can better understand, either what is required, or what to focus on during the session.
Some of these are just very good examples mixed with examples that are relateable, so either people that the paddlers knows, or in locations that they may want to try themselves.
OVERALL
The end! Sorry this may have been long, but there is a lot of information in this article, find what works best for you.
OVERALL
The end! Sorry this may have been long, but there is a lot of information in this article, find what works best for you.
