In this two part article we will look at three types of upstream.
( I hope to cover more in the future)
- One Stroke Bow Rudder upstream.
- Bow Rudder Into Exit Sweep/Drive upstream.
- Reverse Stroke upstream.
This first part will focus on, what we want out of an upstream and the one stroke bow rudder up.
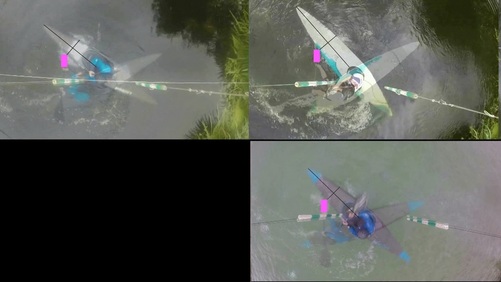
So why an Overhead View?
1- It is a static view. The camera can be placed in a similar place each time in multiple locations, therefore we can compare easily against others, and ourselves in the future.
2 - We will get to see how long a line we take around the upstream, the line of our hips. and where stokes are places against fixed objects (inside and outside poles)
So, what do we want out of an upstream?
( I hope to cover more in the future)
- One Stroke Bow Rudder upstream.
- Bow Rudder Into Exit Sweep/Drive upstream.
- Reverse Stroke upstream.
This first part will focus on, what we want out of an upstream and the one stroke bow rudder up.
So why an Overhead View?
1- It is a static view. The camera can be placed in a similar place each time in multiple locations, therefore we can compare easily against others, and ourselves in the future.
2 - We will get to see how long a line we take around the upstream, the line of our hips. and where stokes are places against fixed objects (inside and outside poles)
So, what do we want out of an upstream?
The two things I think are most important to an upstream
1 – Be in a position on the exit of the upstream to be able to negotiate the next gate.
2 – Complete the gate as quickly as possible whilst still achieving point 1.
In order to achieve these two points then we must consider a few factors. Obviously each upstream, and each exit to the next gate is going to be different, but these variables will always apply.
1 – On the exit of the up we must have our hips above the gateline, in order to exit cleanly, so to not touch or be hindered by the inside pole.
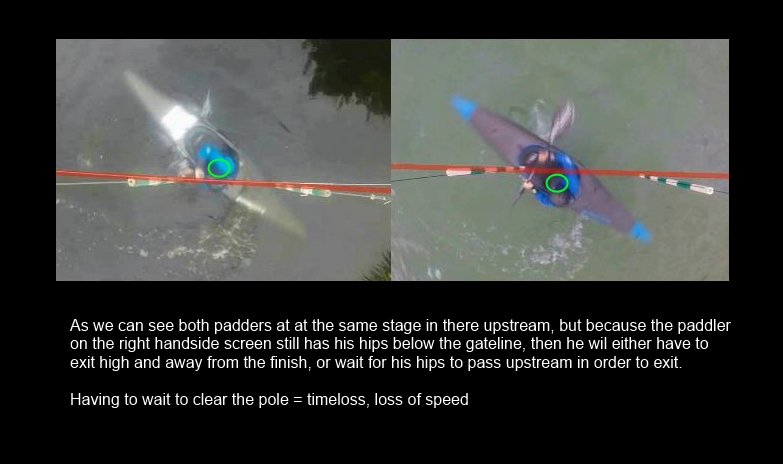
This means in the case of a classic one stroke bow rudder up, or a two stroke bow rudder to sweep/drive getting the hips from below the gateline to above the gateline, and in the case of a classic reverse up or fix, keeping the hips above the gateline. (Note, fix's, reverse ups and some more extreme ups, the hips can be left outside the inside pole)
2 – Either staying around the inside pole, or carrying such speed around the upstream, that taking a longer line is beneficial
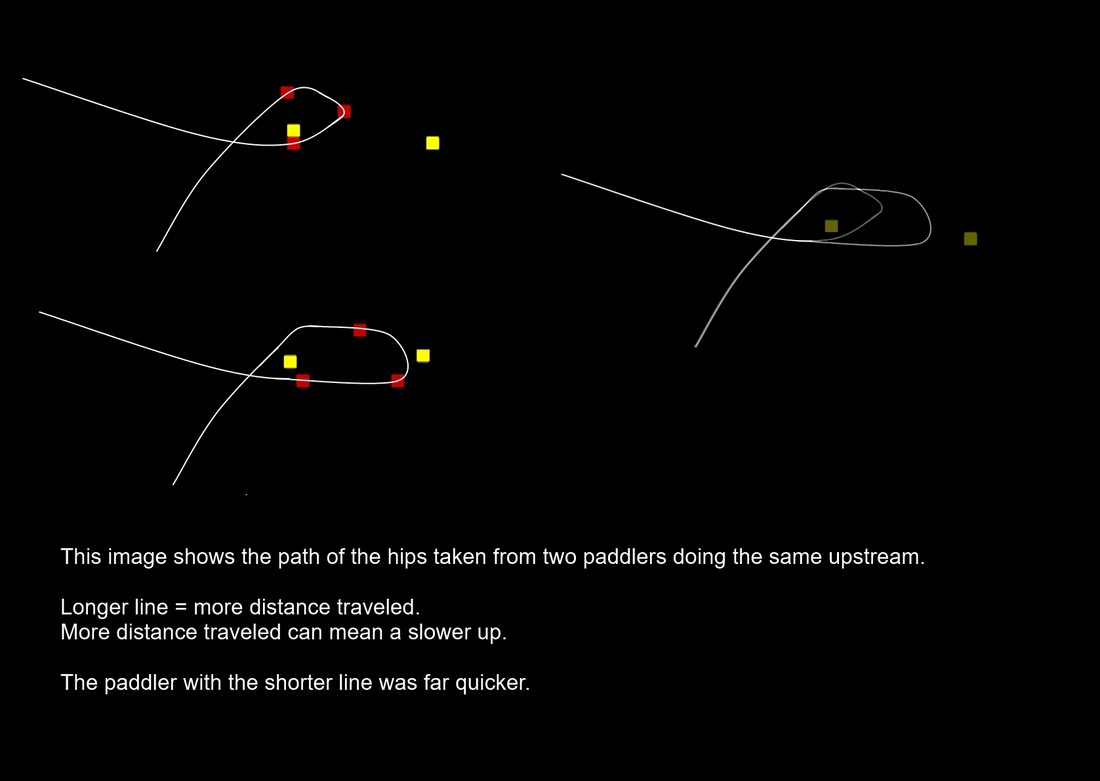
Ideally we want to stay around the inside pole and take as little distance around the upstream as possible. The longer our line the most distance we have travelled. Reducing distance often saves time, but never at the cost of speed and run on the boat. This then is a balancing act. I would often take a longer line if there is a punt available, and the speed and my position on exit is optimised by this. However as a general rule, we want to whip the boat around the inside pole.
3 – Having good efficient and smooth bladework.
It is pointless being in the right place, but having a week bowrudder/badly performed reverse/sweep, or we cannot move the paddle and blade around the pole.
Now we will look at three different styles of up in turn. To understand better what we want from each up, we will break the up down into positioning and movement, bladework, then any additional factors that are important. We shall look at both good and bad examples to show the differences between the two, so we can better understand why we want to be where we should be.
The one stroke bow rudder up.
Key Points for a one stroke bow rudder up.
- Using a bow rudder.
- Keeping hips around inside pole.
- Getting hips from below bearer line to above bearer line.
- Keeping bow rudder outside and above inside pole.
- Using edges to help hips move upstream, and stop slide in.
- J line in and putting bows under or above outside pole.
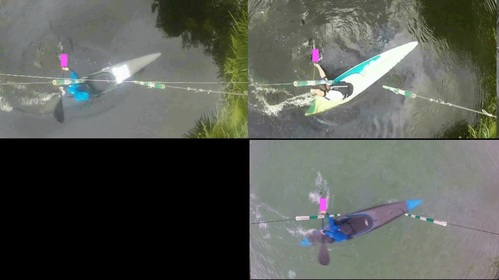
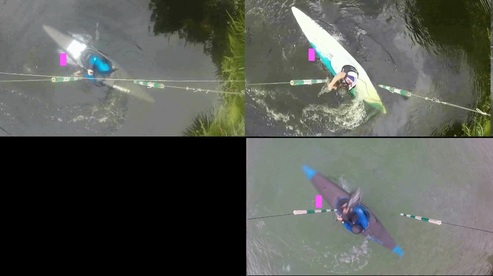
The below video shows these key points by highlighting three paddlers at differing stages of development, and how the amount of turn, hip positioning and bladework affect the upstream.
Expanding upon key points
For more information on how to get the hips moving up.
Expanding upon key points
For more information on how to get the hips moving up.
See Up progression article here
and
Upstream articles parts 1-3 to see use of J-line in and edges here
and
Upstream articles parts 1-3 to see use of J-line in and edges here
Also gripping with the edge also stops the boat sliding across the water and towards the outside pole.
Holding blade above and outside of the gate – lamppost example.
Imagine swing around a lampost. That is pretty much what we want to do around our bow rudder.
Now if our bow rudder is outside and above the inside pole. This will swing the hips upstream and around the inside pole. If the bow rudder however is below the inside pole then the boat will swing around and on the spot. The bows (along with edges helping) will spin around to where-ever the bow rudder is placed.
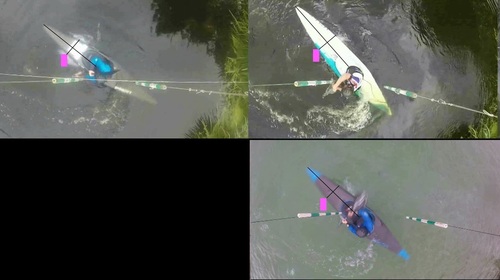
Interesting to see in this third image how the position of where the bow rudder is on the entry to the gate, matches with the middle of the bows
Getting the blade back outside of the inside pole quickly. This either means the blade is ready to be pulled upon as soon as the desired exit angle is ready, or can catch the moving water in the current and pull you out and down away from the gate (effectively acting like a sail in the wind moving you forwards)
The below video shows this well
Additional
Tips to help boat move into the gate line
See Up progression article here
and
Upstream articles parts 1-3 to see use of J-line in and edges here
Also consider placing someone as a blocker below the gateline
See Coaching tips article here for reference to this
Tips to help keep blade outside and above the inside pole
Tips to help keep blade outside and above the inside pole
Try with only taking the top hand off the paddle first. If you can leave the paddle above and outside of the inside pole, then you should be able to just reach back around the pole to replace the hand back on he paddle.
Relevance
Some may say, this is only flatwater. Technique is different on the whitewater.
I agree each up is different, but the same concepts still apply
You can see the same components that cause the issue on the flat are still there in the whitewater. The eddy helps the hips move up more in the whitewater setting, but the exit is far quicker and more optimal on the quicker up.
The below up is of me, showing very similar position and stroke work around both the flat and whitewater upstream.
So we can see with better positioning, blade work, and discipline of these key point on the flatwater, we should see transfer onto the whitewater, as long as we keep discipled and follow these key points
The better our skills, and more discipline we put into our upstreams, the faster we will be.
END OF PART 1
